Guide to Working With JSON in SQL 2016 Part 2 - Output and Format

In part 2 of this series we are going to explore the process of getting data out of a SQL database and in to a usable JSON document. Like FOR XML in the past, Microsoft introduced the FOR JSON clause to format the result of a query as a JSON document. If you want to produce a flat document the FOR JSON clause works just fine for that, but most documents are not flat and will contain nested objects and arrays so we need to know how to deal with that. That will be the focus of this post.

Part of the trick to outputting a meaningful JSON document is understanding the limitations and behaviors of the FOR JSON clause and how to work around them. We will explain in the examples below.

First we need to create our tables that represent the relational data.

-- Create the relational tables

CREATE TABLE #Products (
   ProductNumber int
  ,ProductName varchar(25)
  ,ProductType varchar(20)
  ,Runtime smallint );

INSERT INTO #Products 
SELECT 45975, 'Spiderman', 'Movie', 110
INSERT INTO #Products 
SELECT 96587, 'Batman', 'Movie', 98
INSERT INTO #Products 
SELECT 25893, 'SuperMan', 'Movie', 102

-- For releases and assets, only include records for a single movie to keep it simple

CREATE TABLE #Releases (
   Country varchar(30)
  ,HomeReleaseDate datetime2(0)
  ,ProductNumber int )

INSERT INTO #Releases 
SELECT 'United States', DATEADD(dd, -329, GETDATE()), 96587;
INSERT INTO #Releases 
SELECT 'France', DATEADD(dd, -256, GETDATE()), 96587;
INSERT INTO #Releases 
SELECT 'Germany', DATEADD(dd, -215, GETDATE()), 96587;

CREATE TABLE #Assets (
   ProductNumber int
  ,Languages varchar(20)
  ,TitleName varchar(50) )

INSERT INTO #Assets 
SELECT 96587, 'English', 'Batman';
INSERT INTO #Assets 
SELECT 96587, 'French', 'LeBat';
INSERT INTO #Assets 
SELECT 96587, 'German', 'Bachman';

Now we need to create a table where we can combine our results. We need to produce multiple JSON outputs for a single record and then combine all of those outputs. We are going to create our combine table and then insert the first record. We will come back and update this record with supporting data for the final output.

CREATE TABLE #Combine (
   Product nvarchar(max)
  ,Releases nvarchar(max)
  ,Assets nvarchar(max) )

INSERT INTO #Combine (Product)
VALUES ((
   SELECT
      ProductNumber
     ,ProductName
     ,ProductType
     ,Runtime
   FROM #Products
   WHERE ProductNumber = 96587
   FOR JSON PATH, WITHOUT_ARRAY_WRAPPER))

The product field in the #Combine table represents a JSON document for the product 96587, Batman. The releases field represents an array of embedded objects that is part of the product document, the same with assets. We are producing three different related JSON results and then combining them in to one. The JSON PATH clause by itself cannot output embedded documents so we have to do this manually (well actually it can, kind of, if you use ROOT, but you don't have much control of the output and when dealing with multiple table joins, it does what it wants, which is not likely what you want). Also to note, in the FOR JSON PATH above we use the option WITHOUT_ARRAY_WRAPPER. This eliminates the square brackets from the JSON output. We only want to exclude this for the parent document. Now we are going to update the other fields and take a look at what we have so far.

UPDATE #Combine 
   SET Releases = (
      SELECT
         ProductNumber
        ,Country
        ,HomeReleaseDate
       FROM #Releases
FOR JSON PATH, ROOT('Releases'))

UPDATE #Combine
   SET Assets = (
      SELECT 
         Languages
        ,TitleName
      FROM #Assets
FOR JSON AUTO, ROOT('Assets') )

SELECT * FROM #Combine

So we effectively have 3 JSON documents we need to combine in to a single document. To do this we use the following.

SELECT
   STUFF(Product,LEN(Product),1, ',') + 
   STUFF(STUFF(Releases, 1, 1, ''), LEN(Releases) - 1, 1, ',') +
   STUFF(Assets, 1, 1, '')
FROM #Combine

The query above doesn't do anything special except combine the documents. Copy the result and paste it in to a JSON validator to see the end result.   

It's not pretty but it works. Would I use it in production? Probably not. Keep in mind this is only version 1.0, hopefully we will see improvements to this in future releases. We can hope that Microsoft follows in the footsteps of Postgres, with a true native data type. Or of course you could do all of this in an application just as easily.

Guide to Working With JSON in SQL 2016 Part 1 - Storing and Querying

Microsoft SQL Server 2016 introduced support for JSON. Microsoft added the FOR JSON clause to build a JSON structured result from an existing relational DB, and they also added a handful of new functions to query a JSON document stored in a SQL table. That is the focus of Part 1 in this series, how to store JSON documents in a SQL database and how to query those documents.

Here are the new functions we will be exploring in this post:

JSON_VALUE – Extract a value from a JSON string
OPENJSON – Table Valued Function that parses JSON text. Returns objects and properties as rows and columns.

A few important notes:

  • JSON is case sensitive. If the JSON object is "FilmDetails" and you try querying "filmdetails", it will fail. Make sure you check your case when trouble shooting your queries.
  • There isn't a JSON data type in SQL. We have JSON support in SQL 2016 not a data type. JSON documents are stored as nvarchar(max), but don't let this discourage you from exploring these features.
  • You can create a CHECK constraint on the table you store your JSON documents to check the document is valid JSON, but this is not required (ISJSON(<JSONData>) > 0
  • You can create your table as memory optimized, FYI.

If you need a refresher on JSON structures, Look Here.

Here is our table definition and the JSON document we will be storing in the table:

CREATE TABLE JSONTable (
   ID int IDENTITY (1,1) PRIMARY KEY CLUSTERED
  ,JSONDocument nvarchar(max) );

INSERT INTO JSONTable
SELECT '{  
   "FilmDetails":{  
      "ProductNumber":"9912088751",
      "Title":"Brave",
      "Type":"Movie",
      "Runtime":93,
      "ReleaseYear":2012,
      "Synopses":[  
         {  
            "Locale":"en",
            "Text":"Princess Merida uses her bravery and archery skills to battle a curse and restore peace..."
         },
         {  
            "Locale":"de",
            "Text":"Animiert"
         },
         {  
            "Locale":"fr",
            "Text":"Au coeur des contrées sauvages dÉcosse, Merida, la fille du roi Fergus et de la reine Elinor..."
         }
      ],
      "Assets":[  
         {  
            "Name":"Stickers",
            "AssetType":"Stickers",
            "FileType":"PDF",
            "Location":"http://media.brave.stickers.pdf",
            "Locale":"en-US"
         },
         {  
            "Name":"Trailer - WMV",
            "AssetType":"Trailer - WMV",
            "FileType":"Video",
            "Location":"http://youtu.be/Shg79Shgn",
            "Locale":"en-US"
         }
      ]
   }
}';

First let's look at the JSON_VALUE function, we will use this to return values from our JSON document.

SELECT
   JSON_VALUE(JSONDocument, '$.FilmDetails.ProductNumber') AS ProductNumber
  ,JSON_VALUE(JSONDocument, '$.FilmDetails.Title') AS Title
  ,JSON_VALUE(JSONDocument, '$.FilmDetails.Type') AS ContentType
  ,JSON_VALUE(JSONDocument, '$.FilmDetails.Runtime') AS Runtime
  ,JSON_VALUE(JSONDocument, '$.FilmDetails.ReleaseYear') AS ReleaseYear
FROM JSONTable

In the example above, we are simply grabbing the values from the name/value pairs found in the FilmDetails object. Simple enough, but we also have a few arrays defined and we want to extract values from the different arrays as well. You could try calling the specific array key, but if you have many arrays you might not know the position. For example:

SELECT
   JSON_VALUE(JSONDocument, '$.FilmDetails.ProductNumber') AS ProductNumber
  ,JSON_VALUE(JSONDocument, '$.FilmDetails.Synopses[0].Text') AS SynopsesTextEn
  ,JSON_VALUE(JSONDocument, '$.FilmDetails.Synopses[1].Locale') AS Locale
  ,JSON_VALUE(JSONDocument, '$.FilmDetails.Assets[1].Location') AS TrailerLocation
FROM JSONTable

You see the [0], [1] which follows the Synopses object? That is the key value for the element we are trying to extract our values from. While this does work, let's take a look at another option, OPENJSON. OPENJSON is a table valued function that returns objects and properties as rows and columns. You can use OPENJSON with the default schema or you can create a custom schema for your output. Each produces very different results so let's look at both of them. First using the default schema:

SELECT
   JSON_VALUE(JSONDocument, '$.FilmDetails.ProductNumber') AS ProductNumber
  ,JSON_VALUE(JSONDocument, '$.FilmDetails.Title') AS Title
  ,[key] AS JSONObject
  ,[value] AS JSONValue
  ,[type] AS TypeOfValue
FROM JSONTable
CROSS APPLY OPENJSON(JSONDocument)

When you use OPENJSON with the default schema, the function returns a table with one row for each property of the object or for each element in the array. What happens if we target an object in the function?

SELECT
   JSON_VALUE(JSONDocument, '$.FilmDetails.ProductNumber') AS ProductNumber
  ,JSON_VALUE(JSONDocument, '$.FilmDetails.Title') AS Title
  ,[key] AS ArrayElementKey
  ,[value] AS ArrayValue
  ,[type] AS TypeOfValue
FROM JSONTable
CROSS APPLY OPENJSON(JSONDocument, '$.FilmDetails.Synopses')

If jsonExpression contains a JSON object (in this case $.FilmDetails.Synopses) , OPENJSON returns all the first level properties of the object. That's cool, but we still need to return values from the different arrays. Let's try to define a custom schema and see what happens:

SELECT *
FROM JSONTable
CROSS APPLY OPENJSON(JSONDocument, '$.FilmDetails.Synopses')
WITH (
   Locale varchar(3) '$.Locale'
  ,SynopsesText nvarchar(2000) '$.Text')
WHERE JSON_VALUE(JSONDocument, '$.FilmDetails.Title') LIKE '%Brave%'

Added a where clause to simplify the result.

We now have results for Locale and SynopsesText, but we are also getting the entire JSONDocument and ID. We want to be able to return a single filtered result. Notice in the query below we can use the column names defined in the WITH clause of the OPENJSON table valued function at the beginning of our select. We are also adding the value from JSON_VALUE from the FilmDetails object. The output is starting to look more meaningful.

SELECT
   JSON_VALUE(JSONDocument, '$.FilmDetails.ProductNumber') AS ProductNumber
  ,JSON_VALUE(JSONDocument, '$.FilmDetails.Title') AS Title
  ,JSON_VALUE(JSONDocument, '$.FilmDetails.Type') AS ContentType
  ,JSON_VALUE(JSONDocument, '$.FilmDetails.Runtime') AS Runtime
  ,JSON_VALUE(JSONDocument, '$.FilmDetails.ReleaseYear') AS ReleaseYear
  ,Locale
  ,SynopsesText
FROM JSONTable
CROSS APPLY OPENJSON(JSONDocument, '$.FilmDetails.Synopses')
WITH (
   Locale varchar(3) '$.Locale'
  ,SynopsesText nvarchar(2000) '$.Text')
WHERE JSON_VALUE(JSONDocument, '$.FilmDetails.Title') LIKE '%Brave%'
   AND Locale = 'en'

We can assume that our JSON document will have multiple arrays, and we'll need to extract the details from those arrays, so how do we do that? Let's try to add another CROSS APPLY to the "Assets" array and add the values to our main SELECT to see what we get:

SELECT
   JSON_VALUE(JSONDocument, '$.FilmDetails.ProductNumber') AS ProductNumber
  ,JSON_VALUE(JSONDocument, '$.FilmDetails.Title') AS Title
  ,JSON_VALUE(JSONDocument, '$.FilmDetails.Type') AS ContentType
  ,JSON_VALUE(JSONDocument, '$.FilmDetails.Runtime') AS Runtime
  ,JSON_VALUE(JSONDocument, '$.FilmDetails.ReleaseYear') AS ReleaseYear
  ,Locale
  ,SynopsesText
  ,Name AS AssetName
  ,FileType AS AssetFileType
  ,[Location] AS AssetLocation
FROM JSONTable
CROSS APPLY OPENJSON(JSONDocument, '$.FilmDetails.Synopses')
WITH (
   Locale varchar(3) '$.Locale'
  ,SynopsesText nvarchar(2000) '$.Text')
CROSS APPLY OPENJSON(JSONDocument, '$.FilmDetails.Assets')
WITH (
   Name varchar(25) '$.Name'
  ,FileType varchar(25) '$.FileType'
  ,[Location] nvarchar(500) '$.Location' )
WHERE JSON_VALUE(JSONDocument, '$.FilmDetails.Title') LIKE '%Brave%'
   AND Locale = 'en'
   AND FileType = 'video'

At this point you should be returning a single line of filtered data that gets values from multiple arrays and objects in your JSON document. You can add indexes to your JSON data to increase performance.  Microsoft has introduced an interesting new feature set with JSON support in 2016, you should check it out in its entirety.

In part 2 of this series we are going to explore outputting JSON documents from normalized tables. We will look at outputting arrarys and assembling complex JSON documents from SQL.

Guide to Using Temporal Tables in SQL 2016

Temporal tables give us the ability to add version history to our data. If you want to track data changes to a table, see what a value was at a specific point in time, find when a value was last changed, or union historic records with current table records, temporal tables can do all of that. Temporal tables can be created on new or existing tables. Temporal tables are an exact replica of a new or existing table. You can think of temporal tables as a versioning table with the same definition as the table it's tracking, they are paired. This sounds more complicated than it is, let's get to the scripts.

First we're going to create a new table that also includes our temporal table. 

CREATE TABLE dbo.Orders (
   Id int IDENTITY (1,1) PRIMARY KEY CLUSTERED
  ,OrderNumber int NOT NULL
  ,ProductID int NOT NULL
  ,SalesPersonID int NOT NULL
  ,Amount decimal (7,2) NOT NULL
  ,SalesDate datetime2(0) DEFAULT GETDATE()
  ,ValidFrom datetime2(2) GENERATED ALWAYS AS ROW START -- Required field, can be named whatever you like.
  ,Validto datetime2(2) GENERATED ALWAYS AS ROW END -- Required field, can be named whatever you like.
  ,PERIOD FOR SYSTEM_TIME (ValidFrom, ValidTo) )
WITH (SYSTEM_VERSIONING = ON (HISTORY_TABLE = dbo.Orders_Archive));

Let's look at what's new in our table definition. See the ValidFrom and ValidTo columns, these are referred to as period columns and are used to track the state of the row at the time the row was updated, the data type here should be datetime2(2), these columns are required. The GENERATED ALWAYS (START | END) arguments specify a start and end time for when the record was valid. The PERIOD FOR SYSTEM_TIME argument specifies the names of the columns the system will use to record the valid period of a row of data, in this case ValidfFrom and ValidTo. Finally we have the table option WITH (SYSTEM_VERSIONING = ON (HISTORY_TABLE = dbo.Orders_Archive)). SYSTEM_VERSIONING just enables versioning (for the temporal table) on the table you are creating. HISTORY_TABLE lets us target a specific history table, this could be an existing history table or a new history table. The above script will create a new history table named dbo.Orderes_Archive.

Now that we have our temporal table setup, let's see how it works. First we need to insert some data, notice we do not specify values for the ValidFrom and ValidTo columns. 

INSERT INTO dbo.Orders (OrderNumber, ProductID, SalesPersonID, Amount)
SELECT 85462, 989, 11, 10.99
INSERT INTO dbo.Orders (OrderNumber, ProductID, SalesPersonID, Amount)
SELECT 85486, 325, 12, 14.95
INSERT INTO dbo.Orders (OrderNumber, ProductID, SalesPersonID, Amount)
SELECT 85501, 193, 11, 21.99 

Now let's see what's in the tables we just created. We won't have anything in the history table Orders_Archive, not until we actually modify data in the Orders table. Query the tables, then run the update, and then query both tables again to see the results. 

SELECT * FROM dbo.Orders;
SELECT * FROM dbo.Orders_Archive;

 --Now we need to update the Orders table.

UPDATE dbo.Orders
   SET Amount = 50.00
WHERE Id = 2; 

After the update we should now have a single row in the Orders_Archive history table. This row represents the data before it was modified and the period of time that is was valid using the ValidFrom and ValidTo values.

Now what if we want to query the Orders table and this time include the table history values. We can do this using the SYSTEM_TIME clause in our FROM. Here we want to return all values that were valid between yesterday and tomorrow from both the parent and history table. Notice we don't have to call the Orders_Archive table directly, using SYSTEM_TIME allows us to query both tables by referencing only the parent Orders table. 

DECLARE 
   @Start datetime2(2) = DATEADD(DD, -1, GETDATE())
  ,@End datetime2(2) = DATEADD(DD, 1, GETDATE())
SELECT * 
FROM dbo.Orders
FOR SYSTEM_TIME BETWEEN @Start AND @End

There are 4 temporal-specific sub-clauses we can use with the SYSTEM_TIME clause to perform different time based analysis. As follows:

AS OF <date_time>
FROM <start_date_time> TO <end_date_time>
BETWEEN <start_date_time> AND <end_date_time>
CONTAINED IN (<start_date_time> , <end_date_time>)

This gives a lot of flexibility to how we query the data. We can query just the Orders data, just the Orders_Archive data, or both.

Some notes about table management:

  • You can create indexes on either the Orders or Orders_Archive table, creating an index on one does not create it on the other. Same goes for statistics.
  • Modifying a data type on the parent table Orders, will automatically modify the data type in the history table, Orders_Archive.
  • Adding a new column to the Orders table will automatically add that column to the history table.
  • Before you can drop a table that has versioning enabled on it, we must first disable versioning. You can drop a parent table without dropping the history table, they are independent of each other when you disable versioning.
-- Adding an index

CREATE NONCLUSTERED INDEX NCIX_SalesPersonID ON dbo.Orders (
SalesPersonID )
WITH (FILLFACTOR = 90);

-- Must be added to both

CREATE NONCLUSTERED INDEX NCIX_SalesPersonID ON dbo.Orders_Archive (
SalesPersonID )
WITH (FILLFACTOR = 90);

-- Altering the data type of an existing column or adding a new column automatically adds it to the history table

ALTER TABLE dbo.Orders ALTER COLUMN Amount decimal(12,2);
ALTER TABLE dbo.Orders ADD Region varchar(3);

-- Disable versioning and drop the table

ALTER TABLE dbo.Orders SET (SYSTEM_VERSIONING = OFF);
DROP TABLE dbo.Orders;
DROP TABLE dbo.Orders_Archive;

Temporal tables are a nice addition to SQL 2016, and believe or not I think they are available in standard edition. Have fun!

Migrating SSRS to 2016 - Subscriptions and Eliminating Errors in the Error Log

Migrating from SQL Reporting Services 2012 to 2016 is a fairly straightforward process that doesn't require a lot of attention here. What I do want to talk about is SSRS subscriptions. When you migrate an SSRS instance from one server to another, unless you also restore msdb those subscription jobs won't be coming with you. The subscriptions still exist in your ReportServer database and because the subscriptions are still in the ReportServer database and not in msdb, SSRS starts recording errors to the SSRS error logs to the tune of around 32MB a minute worth of logs. This happens because SSRS is looking for the Agent job for a subscription in the ReportServer database but it's not there so it logs an error. And it will keep checking over and over and over (Microsoft will likely change this behavior, we can hope). So how do we keep our logs in check and fix our subscriptions? Just run the following script:

DECLARE 
   @ownerLogin VARCHAR(100)
  ,@scheduleId VARCHAR(36)

SET @ownerLogin=N'MyDomain\ssrsAdmin' --SSRS Service Account which is also an admin in Report Manager

DECLARE JobCreateCursor CURSOR STATIC FORWARD_ONLY
FOR
SELECT CAST(ScheduleID AS VARCHAR(36)) AS ScheduleId 
FROM schedule

OPEN JobCreateCursor
FETCH NEXT FROM JobCreateCursor INTO @scheduleId

WHILE @@FETCH_STATUS = 0
BEGIN

EXEC msdb.dbo.sp_add_job @job_name = @scheduleId,@owner_login_name = @ownerLogin

FETCH NEXT FROM JobCreateCursor INTO @scheduleId

END

CLOSE JobCreateCursor
DEALLOCATE JobCreateCursor

Notice we aren't creating any job steps here, that's because SSRS will do that for us. Once you create the Agent jobs SSRS goes and validates those jobs and adds the steps as part of the subscriptions. If you try to go to the properties of one of the newly created jobs you will get an error until SSRS runs it's linking process, then you will be able to view the jobs and the subscription will run as it did on the old server. That and you won't be filling up the drive with SSRS error logs.

Troubleshooting Custom dll’s (ionic) in Script Tasks in SSIS

Script tasks are a great way to enrich your ETL, especially when you have complex requirements that can't easily be accomplished in a simple task or expression. The other day while working on a project I ran across an issue involving a script task and a custom dll, specifically ionic.zip.dll.  The script task was failing so I started looking in to the dll. As I was troubleshooting the issue I put together this guide so we could replicate our steps in production. Here is a simple checklist you can follow when working with script tasks and custom dll's in SSIS.

  • Copy the dll's to your target assemblies directory (depending on your environment, your directory may be different): C:\Program Files (x86)\Reference Assemblies\Microsoft\Framework\.NETFramework\v4.0
  • Once you copy the dll's, right click and go to properties of each dll and make sure the file is not marked as "blocked". Windows will mark a copied file it thinks is dangerous to run on the machine, like a dll or executable, as blocked. Click Unblock and apply/ok.
  • Open the Script task in SSIS. Click on the references folder in Solution Explorer. Highlight the dll you are calling. Under reference properties, set the Copy Local option to True.
  • When working with a custom dll you may need to register it to the GAC (Global Assembly Cache), unless you have a proper installer for it. Open a CMD prompt and navigate to the folder where the gacutil.exe is. Mine could be found here: C:\Program Files (x86)\Microsoft SDKs\Windows\v7.0A\bin\NETFX 4.0 Tools, though yours might be different. Copy your dll to the folder and register it. Gacutil usage can be found here: https://msdn.microsoft.com/en-us/library/ex0ss12c(v=vs.110).aspx

Capture DTU Performance Stats in SQL Azure Database

One of the challenges of working in SQL Azure database is ensuring your database is positioned in the correct service tier so that you are not overpaying or underperforming. SQL Azure database introduced a new DMV and system view that tracks performance related to Database Throughput Units (DTU). It's not going to answer a whole lot of questions by itself, but it can be helpful to view over-time stats for baselines. Used with other monitoring tools, query execution stats, etc., you should be able to dial in performance and find a good match for your service tier.

The sys.dm_db_resource_stats DMV is only available in the target user database and displays the last hour of performance data, to get anything beyond that you need to look at the sys view in the master database.

-- Basic view, last hour. Make sure you are in the target user database.

SELECT * FROM sys.dm_db_resource_stats

-- Last hour of performance using the sys.dm_db_resource_stats DMV.

SELECT DISTINCT
   MIN(end_time) AS StartTime
  ,MAX(end_time) AS EndTime
  ,CAST(AVG(avg_cpu_percent) AS decimal(4,2)) AS Avg_CPU
  ,MAX(avg_cpu_percent) AS Max_CPU
  ,CAST(AVG(avg_data_io_percent) AS decimal(4,2)) AS Avg_IO
  ,MAX(avg_data_io_percent) AS Max_IO
  ,CAST(AVG(avg_log_write_percent) AS decimal(4,2)) AS Avg_LogWrite
  ,MAX(avg_log_write_percent) AS Max_LogWrite
  ,CAST(AVG(avg_memory_usage_percent) AS decimal(4,2)) AS Avg_Memory
  ,MAX(avg_memory_usage_percent) AS Max_Memory    
FROM sys.dm_db_resource_stats

-----------------------------------------------------------------------------------
-- Performance over period of time. Uses the sys.resource_stats table in master db

DECLARE @StartDate date = DATEADD(day, -7, GETDATE()) -- 7 Days

SELECT DISTINCT
   MAX(database_name) AS DatabaseName
  ,MAX(sku) AS PlatformTier
  ,MAX(storage_in_megabytes) AS StorageMB
  ,MIN(end_time) AS StartTime
  ,MAX(end_time) AS EndTime
  ,CAST(AVG(avg_cpu_percent) AS decimal(4,2)) AS Avg_CPU
  ,MAX(avg_cpu_percent) AS Max_CPU
  ,CAST(AVG(avg_data_io_percent) AS decimal(4,2)) AS Avg_IO
  ,MAX(avg_data_io_percent) AS Max_IO
  ,CAST(AVG(avg_log_write_percent) AS decimal(4,2)) AS Avg_LogWrite
  ,MAX(avg_log_write_percent) AS Max_LogWrite
FROM sys.resource_stats
WHERE database_name = 'YourDatabaseName'
   AND start_time > @StartDate;

----------------------------------------------------------------------------
-- Find how well the database workload fits in to its current service tier.

SELECT
   (COUNT(database_name) - SUM(CASE WHEN avg_cpu_percent >= 40 THEN 1 ELSE 0 END) * 1.0) / COUNT(database_name) * 100 AS [CPU Fit %]
  ,(COUNT(database_name) - SUM(CASE WHEN avg_log_write_percent >= 40 THEN 1 ELSE 0 END) * 1.0) / COUNT(database_name) * 100 AS [Log Write Fit %]
  ,(COUNT(database_name) - SUM(CASE WHEN avg_data_io_percent >= 40 THEN 1 ELSE 0 END) * 1.0) / COUNT(database_name) * 100 AS [Data IO Fit %]
FROM sys.resource_stats
WHERE database_name = 'YourDatabaseName' 
   AND start_time > DATEADD(day, -7, GETDATE()); 

If the query above returns a value of less than 99.9 for any of the three resources, then you probably have some kind of bottleneck that needs addressing. Look for poor performing queries in the sys.dm_exec_query_stats DMV. If you can't solve your problems with tuning, you might have to make the jump to a higher tier. 

This should help you get started dialing in your service tier for a SQL Azure Database.

Dynamically Build a MERGE Statement - Auto Generated MERGE

Once I worked  on a project that involved moving data from DB2 to MSSQL. We setup jobs in SSIS to copy the data over to staging tables in MSSQL server and then we ran MERGE procedures to merge the data from our staging tables to production. We had more than a 100 jobs that followed this pattern so imagine all the work writing those merge statements. After writing a handful of those I decided to come up with a solution that would write them for me, so here you go, the auto generated merge. 

In the script below, we have a table definition that will hold details for your merge. I usually create this once and then truncate it each time I want to write a new merge statement. Following that we have our variables which define your target and source data. All you need to do is make sure the DynamicMerge table is created and plug in the database name, schema name, and table name of your target table and source table in your variables. Follow the naming convention in the example below. The merge statement assumes you are merging two tables that are identical, but of course you could modify it to meet your needs.

This script can handle null values in the WHEN MATCHED lookup, we use EXCEPT to find unmatched values between source and target.

I like to output the results to text so I can review it before running or placing it in an SP. So when you run the query you will want to output to text and not grid (the default). To do this you will need to change a few settings in SSMS, more specifically you need to change query and text results options in SSMS to allow more characters to be output to text. From the menu: Query>QueryOptions>Results>Text (Uncheck 'Include Column Headers') and Tools>Options>QueryResults>SQLServer>ResultsToText (Increase the maximum number of characters displayed in each column to like 8000). If you don't make these two changes then the output text will be truncated and or you will have a bunch of dashes at the top of the script. 

--Create the DynamicMerge table

CREATE TABLE Staging.dbo.DynamicMerge (
   TableCatalog varchar(500)
  ,TableSchema varchar(100)
  ,TableName varchar(500)
  ,ColumnName varchar(500)
  ,MergeOn varchar(1000)
  ,UpdateOn varchar(1000)
  ,InsertOn varchar(1000)
  ,ExceptSource varchar(500)
  ,ExceptTarget varchar(500)
  ,IsPK bit DEFAULT 0)

USE <DatabaseName>; -- This is the DB of your Target in the merge, make sure you set this.
GO

SET NOCOUNT ON;
GO

-- Truncate the DynamicMerge table every time you use it
TRUNCATE TABLE Staging.dbo.DynamicMerge;

---------------------------------------------------------

-- Insert details to the DynamicMerge table

DECLARE
   @TableCatalog varchar(500) = 'TargetDBName' -- This is the database name
  ,@TableSchema varchar(500) = 'TargetSchemaName' -- Schema for your target table
  ,@TableName varchar(500) = 'TargetTableName' -- This is the table name
  ,@TargetName varchar(1000) = 'DBName.SchemaName.TargetTableName' -- Three part name
  ,@SourceName varchar(1000) = 'DBName.SchemaName.SourceTableName' -- Three part name

INSERT INTO Staging.dbo.DynamicMerge (
   TableCatalog
  ,TableSchema
  ,TableName
  ,ColumnName
  ,MergeOn
  ,UpdateOn
  ,InsertOn
  ,ExceptSource
  ,ExceptTarget )

SELECT
   TABLE_CATALOG
  ,TABLE_SCHEMA
  ,TABLE_NAME
  ,COLUMN_NAME
  ,'Target1.' + COLUMN_NAME + ' = Source1.' + COLUMN_NAME
  ,COLUMN_NAME + ' = Source1.' + COLUMN_NAME
  ,'Source1.' + COLUMN_NAME -- Except Source
  ,'Source1.' + COLUMN_NAME -- Except Target
  ,'Target1.' + COLUMN_NAME 
FROM INFORMATION_SCHEMA.COLUMNS
WHERE TABLE_CATALOG = @TableCatalog
   AND TABLE_SCHEMA = @TableSchema
   AND TABLE_NAME = @TableName; --target table name

--------------------------------------------------------

-- Update the Primary Key flag

UPDATE dt
   SET IsPK = 1
FROM Staging.dbo.DynamicMerge dt
INNER JOIN INFORMATION_SCHEMA.KEY_COLUMN_USAGE ku ON dt.ColumnName =ku.COLUMN_NAME
INNER JOIN INFORMATION_SCHEMA.TABLE_CONSTRAINTS tc ON tc.CONSTRAINT_TYPE ='PRIMARY KEY'
   AND tc.CONSTRAINT_NAME = ku.CONSTRAINT_NAME
   AND ku.TABLE_NAME = dt.TableName;

------------------------------------------------------------------

-- Check the Results (optional)

--SELECT * FROM Staging.dbo.DynamicMerge;

-----------------------------------------------------------------

-- Create the Column list variable

DECLARE @ColumnList varchar(max)
   SET @ColumnList = (
      SELECT STUFF((SELECT ',' + ColumnName + CHAR(10)
      FROM Staging.dbo.DynamicMerge x1
      WHERE x1.TableName = x2.TableName
      FOR XML PATH ('')), 1, 1,'') AS MergeOnColumns
      FROM Staging.dbo.DynamicMerge x2
GROUP BY TableName);

--------------------------------------------------------

-- Create the MergeOnSource variable - matching the unique key

DECLARE @MergeOn varchar(max)
   SET @MergeOn = (
      SELECT STUFF((SELECT 'AND ' + MergeOn + CHAR(10)
      FROM Staging.dbo.DynamicMerge x1
      WHERE x1.TableName = x2.TableName AND x1.IsPK = 1
      FOR XML PATH ('')), 1, 4,'') -- AS MergeOnColumns
      FROM Staging.dbo.DynamicMerge x2
      WHERE IsPK = 1
GROUP BY TableName);

-----------------------------------------

-- Create the Merge EXCEPT Target varable

DECLARE @MExceptTarget varchar(max)
   SET @MExceptTarget = (
      SELECT STUFF((SELECT ', ' + ExceptTarget
      FROM Staging.dbo.DynamicMerge x1
      WHERE x1.TableName = x2.TableName AND x1.IsPK = 0
      FOR XML PATH ('')), 1, 1,'') -- AS UpdateOnColumns
      FROM Staging.dbo.DynamicMerge x2
      WHERE IsPK = 0
GROUP BY TableName );

-----------------------------------------

-- Create the Merge EXCEPT Source variable

DECLARE @MExceptSource varchar(max)
   SET @MExceptSource = (
      SELECT STUFF((SELECT ', ' + ExceptSource
      FROM Staging.dbo.DynamicMerge x1
      WHERE x1.TableName = x2.TableName AND x1.IsPK = 0
      FOR XML PATH ('')), 1, 1,'') -- AS UpdateOnColumns
      FROM Staging.dbo.DynamicMerge x2
      WHERE IsPK = 0
GROUP BY TableName );

-----------------------------------

-- Create the Merge UPDATE variable

DECLARE @MUpdate varchar(max)
   SET @MUpdate = (
      SELECT STUFF((SELECT ',' + UpdateOn + CHAR(10)
      FROM Staging.dbo.DynamicMerge x1
      WHERE x1.TableName = x2.TableName AND x1.IsPK = 0
      FOR XML PATH ('')), 1, 1,'') -- AS UpdateOnColumns
      FROM Staging.dbo.DynamicMerge x2
      WHERE IsPK = 0
GROUP BY TableName);

-----------------------------------

-- Create the Merge INSERT variable

DECLARE @MInsert varchar(max)
   SET @MInsert = (
      SELECT STUFF((SELECT ',' + InsertOn + CHAR(10)
      FROM Staging.dbo.DynamicMerge x1
      WHERE x1.TableName = x2.TableName
      FOR XML PATH ('')), 1, 1,'') -- AS UpdateOnColumns
      FROM Staging.dbo.DynamicMerge x2
GROUP BY TableName);

--------------------------------------------------------------------------

/* Now build the MERGE statement. In the query results window, make sure to output to text and not grid. You will need to increase the character output from the defaults. This is explained at the beginning of this document. */

-- Note* CHAR(10) is a line feed control character. CHAR(13) is a carriage return.

SELECT 'MERGE ' + @TargetName + ' AS Target1' + CHAR(10)
   + 'USING (SELECT ' + @ColumnList + 'FROM ' + @SourceName + ') AS Source1' + CHAR(10)
   + CHAR(10)
   + 'ON (' + CHAR(10)
   + @MergeOn + ')' + CHAR(10)
   + CHAR(10)
   + 'WHEN MATCHED AND EXISTS' + CHAR(10)
   + '(' + CHAR(10)
   + ' SELECT ' + @MExceptSource + CHAR(10)
   + ' EXCEPT' + CHAR(10)
   + ' SELECT ' + @MExceptTarget + CHAR(10)
   + ')' + CHAR(10)
   + CHAR(10)
   + 'THEN UPDATE' + CHAR(10)
   + 'SET ' + @MUpdate
   + CHAR(10)
   + 'WHEN NOT MATCHED BY TARGET THEN INSERT (' + @ColumnList + ')' + CHAR(10)
   + CHAR(10)
   + 'VALUES (' + @MInsert + ')' + CHAR(10)
   + 'WHEN NOT MATCHED BY SOURCE THEN DELETE;' -- Optional DELETE if that is desired

This script has been tested from SQL 2008 through 2016. It was last used against a SQL 2016 server with 2017 SSMS. It works!

Calculate Year Over Year Variance - Subtract From Previous Row Using LAG

Say you want to summarize a value by year and find the variance between each year (row). Imagine you have a table that tracks company sales. You need to summarize sales totals by year and then compare the values year over year and find the variance. Here is a simple way to do this using the LAG function.

* Note * If your data does not have contiguous dates you will need to write different queries to fill in the missing dates. This is known as the missing dates problem and solutions to that can be found HERE

IF OBJECT_ID('tempdb..#SalesData') IS NOT NULL
DROP TABLE #SalesData
DECLARE @StartDate date = '2013-01-01';

WITH rCTE AS (
   SELECT
      CAST(2679 AS decimal(7,2)) AS SalesAmount
     ,@StartDate AS SalesDate
     ,CAST('nadia' as varchar) AS SalesPerson
     ,0 AS TransID

   UNION ALL

   SELECT
      CAST(SalesAmount + (SELECT CAST(CRYPT_GEN_RANDOM(1) AS INT) + 3 - CAST(CRYPT_GEN_RANDOM(1) AS INT)) AS decimal(7,2))
    ,DATEADD(dd, + 3, SalesDate)
    ,REVERSE(SalesPerson)
    ,TransID + 1
   FROM rCTE
   WHERE TransID < 500 )

SELECT
   SalesAmount
  ,SalesDate
  ,SalesPerson
INTO #SalesData
FROM rCTE
WHERE SalesAmount > 1
OPTION (MAXRECURSION 600)

--Let's take a look at the data

SELECT * FROM #SalesData

Now that we have our sales data table, we are going to summarize the data by year and load this to a temp table. Notice the ORDER BY, this is important since we will be using the LAG function next.

SELECT DISTINCT
   YEAR(SalesDate) SalesYear
  ,SUM(SalesAmount) OVER (PARTITION BY YEAR(SalesDate)) AS TotalSalesByYear
INTO #SalesTotals
FROM #SalesData
ORDER BY SalesYear ASC;

After we load our temp table with the summarized annual sales, now we are going to use the LAG function to get the previous row for TotalSalesByYear --this will effectively create a new column for the previous year's sales. You can see in the LAG function below we use the TotalSalesByYear value and then you see a comma and the number 1. The number is the offset or how many rows back you want to look from the current row. You can also specify a default value after the offset, this is the value to return if that offset value returns NULL. By excluding that default value, the default value will return NULL, which is what we want so we don't get a divide by zero error when calculating the variance. Here is a link for LAG usage.

WITH CTEazyE AS (
   SELECT
      SalesYear
     ,TotalSalesByYear
     ,LAG(TotalSalesByYear, 1) OVER(ORDER BY SalesYear ASC) AS PreviousYearSales
   FROM #SalesTotals )    

-- Now we calculate the variance year over year.

SELECT
     SalesYear
    ,TotalSalesByYear
    ,PreviousYearSales
    ,(TotalSalesByYear - PreviousYearSales) AS VarianceAmount
    ,100 * (TotalSalesByYear - PreviousYearSales) / PreviousYearSales AS VariancePercent
FROM CTEazyE

There are other ways to calculate this but the intent of this post was to introduce you to the LAG (LEAD) function. Mind you, the LAG function is a SQL 2012 + feature. 

Running Totals Using the OVER() Clause with ORDER BY

Window functions and the OVER clause have been around since 2005, but back in 2005 you couldn't use ORDER BY for aggregate functions in the OVER clause. As a matter of fact it wasn't until SQL 2012 that they introduced the ability to use ORDER BY with aggregates in your OVER() clause. Here's how you can use the ORDER BY in the OVER() clause to get running totals.

-- Generate some test data

DECLARE @StartDate date = '2014-01-01'
DECLARE @EndDate date = '2014-12-31';
WITH rCTE AS (
   SELECT
      CAST((500 * RAND()) AS decimal(7,2)) AS SalesAmount
     ,@StartDate AS SalesDate
     ,0 AS Level

   UNION ALL

   SELECT
      CAST(SalesAmount + ((SELECT CHECKSUM(NewId()) % 5) * RAND()) AS decimal(7,2))
     ,DATEADD(dd, + 7, SalesDate)
     ,Level + 1
FROM rCTE
WHERE Level < 52)

SELECT SalesAmount, SalesDate
INTO #SalesData
FROM rCTE

In the first query below we use 3 different OVER clauses to partition the data different ways. In the first OVER clause we are partitioning by the month. Since our sales dates are by day and not by month we use the DATEPART function to get the month of the SalesDate and partitioning on that. This will give us the total sales for each month.

Next we want to get running totals by month. In the second partition we are again using the DATEPART function but this time we are using it with year instead of month and we are adding an ORDER BY using the DATEPART month. What this is doing is getting a total sales amount and then ordering by the month to give us running totals by month--the key here is the ORDER BY, this is what gives us running totals.

The last partition is the same as the second partition except it doesn't include an ORDER BY, so it shows us a total for the entire year.

We use DISTINCT in the SELECT to eliminate duplicate rows. The first query also has a WHERE clause to limit the year to 2014 only.

-- Running totals by month for a single year

SELECT DISTINCT
   DATEPART(YEAR, SalesDate) AS SalesYear
  ,DATEPART(MONTH, SalesDate) AS SalesMonth
  ,SUM(SalesAmount) OVER (PARTITION BY DATEPART(MM,SalesDate)) AS [Totals by Month]
  ,SUM(SalesAmount) OVER (PARTITION BY DATEPART(YY,SalesDate) ORDER BY DATEPART(MM,SalesDate)) AS [Running Totals by Month]
  ,SUM(SalesAmount) OVER (PARTITION BY DATEPART(YY,SalesDate)) AS [Total for the Year]
FROM #SalesData
WHERE DATEPART(YEAR, SalesDate) = 2014

Now we'll look at the same query but this time remove the year form the WHERE clause so we have months over multiple years. Since we are expanding to multiple years, if we want to get a simple total by month we would need to include both year and month in the PARTITION. For running totals, nothing changes from the first query.

-- Running totals by year and month over multiple years

SELECT DISTINCT
   DATEPART(YEAR, SalesDate) AS SalesYear
  ,DATEPART(MONTH, SalesDate) AS SalesMonth
  ,SUM(SalesAmount) OVER (PARTITION BY DATEPART(YEAR,SalesDate), DATEPART(MONTH,SalesDate)) AS [Totals by Month]
  ,SUM(SalesAmount) OVER (PARTITION BY DATEPART(YEAR,SalesDate) ORDER BY DATEPART(MM,SalesDate)) AS [Running Totals by Month]
  ,SUM(SalesAmount) OVER (PARTITION BY DATEPART(YEAR,SalesDate)) AS [Total for the Year]
FROM #SalesData

An easy way to get running totals in SQL 2012 +.

Modifying the SSIS Environment Reference in SQL Agent Jobs That Run an SSIS Package in the Service Catalog

If you are using the SSIS Integration Services Catalog and you run SSIS packages in SQL Agent jobs, you are probably taking advantage of the environments feature in SSIS (2012 +). Environments map to individual servers, servers that could be members of a mirror, dev/QA/prod, or servers that are part of a server migration. Assuming you run all of your SSIS on a dedicated server, this gives you a lot of flexibility as to where a package is executed. When you setup an Agent job you tell it what environment you want the job to run in. From time to time you'll need to change this environment during a fail-over or migration or some other event. This is where it gets tricky--there is no easy way to update a large number of SQL Agent jobs, not without modifying string fields in MSDB tables. Honestly, I'm surprised Microsoft hasn't done anything to improve this yet.

I am posting this right from the script I wrote hopefully making it easier to save off to your own script collection. There are 2 parts to this script, the first part shows you how to change the environment reference by modifying the msdb..sysjobsteps table directly, the second part shows you how to modify the jobs using sp_update_jobstep . If you are a go-by-the-book type of person you might want to refer to the second part of the script, otherwise you can light a hundred dollar bill on fire, snapchat a picture of your ass to your boss, and then refer to the first part of the script.

-- The DGAF method

/* First we need to find the environment we are currently using and
   the environment we plan to use. Each of these correspond to 2 different
   servers. */

SELECT
   Reference_ID
  ,Environment_Name
  ,Environment_Folder_Name
FROM SSISDB.internal.environment_references

/* Make a note of your environments, current and target. We are looking for the reference ID that
   corresponds to the current server so we can pass this reference_id as a filter. We are going to update the
   command line in the agent job for all jobs that refer to this environment reference. */

/* Now that you know the environment you want to target, next you can run the query below and filter
   on that environment. We are just selecting first so we can see what we'll be changing, then we will
   update. */

SELECT DISTINCT
   SUBSTRING(js.command, (PATINDEX('%/ENVREFERENCE %', js.command) + 14),2) AS AgentEnvironmentRef
  ,job_id
  ,step_id
  ,command
FROM msdb..sysjobsteps js
WHERE SUBSTRING(js.command, (PATINDEX('%/ENVREFERENCE %', js.command) + 14),2) = '8'; -- '8' is the environment reference_id, this is what we want to change.

/* If we want to update all job steps that reference the environment
   associated with reference_id 8, we could run the following. This will change
   all job steps that reference environment 8 to environment 5 */

--UPDATE msdb..sysjobsteps
--SET command = REPLACE(command, '/ENVREFERENCE 8', '/ENVREFERENCE 5' )
--WHERE SUBSTRING(command, (PATINDEX('%/ENVREFERENCE %', command) + 14),2) = '8'

/* All of this assumes you are comfortable updating the sysjobsteps table directly,
   which many of us are not and it is a practice that Mircosoft doesn't recommend.
   So here is another way we could implement this change using the msdb.dbo.sp_update_jobstep sp. */

--=================================================================

-- The "I only go by the book" method

-- Create a temp table to store job details

CREATE TABLE #Refchange (
   AgentEnvironmentRef nvarchar(5) NOT NULL
  ,job_id uniqueidentifier NOT NULL
  ,step_id int NOT NULL
  ,command nvarchar(2000) NOT NULL );
  
-- Load your temp table with the jobs/steps you want to change        

WITH CTEazyE AS (
   SELECT DISTINCT
      SUBSTRING(js.command, (PATINDEX('%/ENVREFERENCE %', js.command) + 14),2) AS AgentEnvironmentRef
     ,job_id
     ,step_id
     ,command
 FROM msdb..sysjobsteps js
 WHERE SUBSTRING(js.command, (PATINDEX('%/ENVREFERENCE %', js.command) + 14),2) = '8' )
INSERT INTO #Refchange
SELECT
   AgentEnvironmentRef
  ,job_id
  ,step_id
  ,command
FROM CTEazyE c
INNER JOIN SSISDB.internal.environment_references e ON c.AgentEnvironmentRef = e.reference_id
WHERE AgentEnvironmentRef = '8';

-- Take a look at what we have now

SELECT * FROM #Refchange;

-- Update the command field in our temp table, modify the environment reference

UPDATE #Refchange
   SET command = REPLACE(command, '/ENVREFERENCE 8', '/ENVREFERENCE 5' )
WHERE SUBSTRING(command, (PATINDEX('%/ENVREFERENCE %', command) + 14),2) = '8'

/* Now we should have our job, job step, and environment details in our temp table.

Next we need to update each job to use the new environment using sp_update_jobstep. */

DECLARE
   @jobid uniqueidentifier
  ,@stepid int
  ,@newcommand nvarchar(2000)
  
DECLARE UpdateJobCur CURSOR STATIC FORWARD_ONLY
FOR
SELECT
   job_id
  ,step_id
  ,command
FROM #Refchange

OPEN UpdateJobCur
WHILE (1=1)
BEGIN
FETCH NEXT FROM UpdateJobCur INTO @jobid, @stepid, @newcommand

IF @@FETCH_STATUS <> 0 BREAK

SELECT 
   @jobid
  ,@stepid
  ,@newcommand
EXEC msdb.dbo.sp_update_jobstep
     @job_id = @jobid
    ,@step_id = @stepid
    ,@command = @newcommand
END

CLOSE UpdateJobCur;
DEALLOCATE UpdateJobCur;
GO

Make sure you use caution when making changes that affect the SSIS environments in Agent jobs, you could really mess something up if you don't understand what you are changing. Microsoft needs to implement a better way to do this. The connect item can be seen here.

Mirrored Database in Disconnected State - Have you Changed the Mirror Endpoint Owner Recently?

Change Mirroring Endpoint Owners and GRANT CONNECT Permissions on the Endpoint

Let's say you have an ex-employee who at some point created a database mirror on one of your SQL servers. That employee leaves the company so you need to remove them from the differnet environments they had rights to. When you go to remove the account you find out they are the owner of a mirroring endpoint. You use ALTER AUTHORIZATION to change the owner of the mirroring endpoint to the SA account. Simple enough, right?

Did you know, when you change the ownership of a mirroring endpoint SQL server drops any existing GRANT CONNECT permissions on that endpoint? The next time you restart your server all mirrored databases would be in a disconnected state and inaccessible unless you issue GRANT CONNECT permissions to the SQL service account for the mirroring endpoint.

Follow this guide to change an endpoint owner and grant permission on the endpoint.

-- Find out who owns the mirroring endpoint

SELECT
   me.name AS EndpointName    
  ,sp.name AS EndpointOwner -- ID of the principal that created and owns this endpoint
  ,me.type_desc AS EndpointDescription
  ,me.endpoint_id AS EndpointID
  ,me.state_desc AS EndpointState
  ,role_desc AS RoleDescription -- Can be none, partner, witness, or all
FROM sys.database_mirroring_endpoints me
INNER JOIN sys.server_principals sp ON me.principal_id = sp.principal_id

Let's assume the owner of the endpoint is a former employee of the company and we would like to remove their account from the server. Before we can remove their account we first need to change ownership of the endpoint they own. Before you do this, we need to look at permissions on the server endpoints.

-- Check permissions on server endpoints

SELECT
   e.type_desc AS EndpointType
  ,e.name AS EndpointName
  ,sp.[state_desc] AS PermissionState
  ,sp.[permission_name] AS PermissionName
  ,SUSER_NAME(sp.grantor_principal_id) AS GrantedBy
  ,SUSER_NAME(sp.grantee_principal_id) AS GrantedTo
FROM sys.server_permissions sp, sys.endpoints e
WHERE sp.major_id = e.endpoint_id
   AND sp.class_desc = 'ENDPOINT'

You should see a list of permissions on all of your endpoints on the server. We are looking for endpoints of the type DATABASE_MIRRORING, with the GRANT CONNECT permission assigned to the SQL Service Account. If you don't see this permission then you probably changed the owner of the mirroring endpoint without granting connect permissions back to the SQL service account. Keep reading.

-- Change endpoint owner to sa

ALTER AUTHORIZATION ON ENDPOINT::Mirroring TO sa; -- Mirroring is the mirroring endpoint name

-- Let's check the owner again

SELECT
   me.name AS EndpointName    
  ,sp.name AS EndpointOwner
  ,me.type_desc AS EndpointDescription
  ,me.endpoint_id AS EndpointID
  ,me.state_desc AS EndpointState
  ,role_desc AS RoleDescription
FROM sys.database_mirroring_endpoints me
INNER JOIN sys.server_principals sp ON me.principal_id = sp.principal_id

-- Now let's check the server permissions on the endpoint

SELECT
   e.type_desc AS EndpointType
  ,e.name AS EndpointName
  ,sp.[state_desc] AS PermissionState
  ,sp.[permission_name] AS PermissionName
  ,SUSER_NAME(sp.grantor_principal_id) AS GrantedBy
  ,SUSER_NAME(sp.grantee_principal_id) AS GrantedTo
FROM sys.server_permissions sp, sys.endpoints e
WHERE sp.major_id = e.endpoint_id
   AND sp.class_desc = 'ENDPOINT'

Do you see the GRANT CONNECT permission to your service account? No? If you restarted your SQL server right now your mirrors would go in to a disconnected state and the mirrored databases would not be able to be accessed until you issued GRANT CONNECT on the mirroring endpoint.

-- GRANT CONNECT on Mirroring endpoint

GRANT CONNECT ON ENDPOINT::Mirroring TO [YourDomain\DomainAccount];

-- Now let's check the server permissions on the endpoint once again

SELECT
   e.type_desc AS EndpointType
  ,e.name AS EndpointName
  ,sp.[state_desc] AS PermissionState
  ,sp.[permission_name] AS PermissionName
  ,SUSER_NAME(sp.grantor_principal_id) AS GrantedBy
  ,SUSER_NAME(sp.grantee_principal_id) AS GrantedTo
FROM sys.server_permissions sp, sys.endpoints e
WHERE sp.major_id = e.endpoint_id
   AND sp.class_desc = 'ENDPOINT'

You should see the GRANT CONNECT permissions now. Follow these steps to ensure a disruption-free change to your Mirroring endpoint owner!

Here are some additional reference you can follow if you need to further troubleshoot your database mirror.

-- STOP and START a mirroring endpoint

ALTER ENDPOINT Mirroring STATE=STOPPED -- Mirroring is the name of the mirror endpoint

ALTER ENDPOINT Mirroring STATE=STARTED -- Mirroring is the name of the mirror endpoint

-- Resume mirroring after entering a suspended state

ALTER DATABASE <DatabaseName> SET PARTNER RESUME

-- Create a new mirroring endpoint

CREATE ENDPOINT Mirroring

STATE = STARTED

AS TCP (LISTENER_PORT = 5022) -- 5022 is the default port

FOR DATABASE_MIRRORING (ROLE=PARTNER);

Recursive Common Table Expressions - The Recursive CTE

I've seen a lot of posts online on how recursive CTEs work. Almost all of those examples use the same set of data and the same scenario – organizational hierarchy for adventure works employees or something similar. It's not a bad example but I wanted to post something a little different. In this post we will demonstrate exactly how the recursive CTE works from simple to practical examples none of which use the organizational hierarchy examples you will find everywhere else.

First, how do we define a recursive CTE (Common Table Expression)?

A recursive CTE is a CTE that is self-referencing. The CTE is made up of an Anchor member query and a Recursive member query and recursion is made possible using a UNION ALL between the two members. The Recursive member query will always reference the 

The following example is the simplest way of demonstrating the way a recursive CTE works. All we are doing is taking a starting number (0) and adding 5 to it until we hit 50. The anchor query SELECTs the @StartingNumber variable, in this case 0. The recursive member query SELECTs FirstNumber and adds 5 to it (FirstNumber is the alias we defined for @StartingNumber in the anchor query). The anchor query returns the first result and then the recursive member uses that result to get the next result. The anchor result is 0, the recursive member adds 5 to that result for a total of 5.   

A way to visualize this is imagine you have a temp table associated with your anchor query. The anchor query writes the first result to this temp table and then the recursive member uses that result to produce the next row. The new row is inserted into the temp table and the recursive member keeps on processing. So 0 is the first row + 5 = 5. Now 5 is the next row, + 5 = 10. Now 10 is the next row, + 5 = 15. Now 15 is the next row, etc.

With this behavior in mind you can imagine how an incorrectly constructed query could run an infinite number of times. In our example below we have a WHERE clause in the recursive member that will limit our results to a max value of 50. */

DECLARE @StartingNumber int = 0
DECLARE @EndingNumber int = 50;

WITH CTEazyE AS (
-- Anchor member

   SELECT
      @StartingNumber AS FirstNumber -- FirstNumber is the alias we will reference in the recursive query

-- The union is required for recursion

   UNION ALL

--Recursive member

   SELECT
      FirstNumber + 5 -- Adds 5 to the FirstNumber value
   FROM CTEazyE
   WHERE FirstNumber < @EndingNumber ) -- Applying a filter to stop recursion.

SELECT *
FROM CTEazyE

Go ahead and make changes to the query above so you can see the different results. If you are comfortable with execution plans have a look at the execution plan, this will better explain the behavior of how the recursion works. Remember that temp table I mentioned earlier, that is going to be your table spool in the execution plan.

Now let's look at another example this time with dates. In the following query we want to return each month (date) for the last 12 months. The following query uses a start date, in this example 12 months ago today. It then adds one month to the anchor date to get the next date value. If your starting value is (today's date - 12 months), add 1 month to that and you should have (today's date - 11 months). It will keep doing this until it reaches the current date.

DECLARE @StartDate date = DATEADD(mm, -12, GETDATE())
DECLARE @Enddate date = GETDATE()

;WITH CTEazyE AS (
   SELECT
      @StartDate AS StartDate      

   UNION ALL

   SELECT
      DATEADD(mm,1,StartDate)
   FROM CTEazyE
   WHERE StartDate < @Enddate )          

SELECT *
FROM CTEazyE

Let's look at one more example. Say a developer approaches you and says they need to delete a row from a production table. You know this table has other tables referencing it with foreign keys but you don't know which ones off the top of your head. Of those tables referencing this main table it's also possible there are other tables referencing the tables that are referencing this main table. You don't use cascade delete so you need to delete records manually in each of these tables. You need to produce a Foreign Key chain for all tables involved in this delete.

In the script below we use the @PTable variable to define the target parent table--this is the table you want to delete the row from. The anchor query returns the object_id and table name of the target parent table. We define the rest of the columns and populate these columns with NULL values. These NULL fields will get actual values from the recursive member query each execution that follows the anchor. The key here is the INNER JOIN, we are joining the referenced_object_id field from the recursive query to the ObjectID of the anchor query. The referenced_object_id is the parent table in a foreign key. So each time we produce a new referenced_object_id we are going to get all objects that reference the that object id.

In the example below we are creating a few temp tables with FK constraints. Table 2 references table 1 and table 3 references table 2. This query will allow us to see the foreign key chain using our recursive CTE.   

USE <databaseName>;


CREATE TABLE t1 (ID INT NOT NULL IDENTITY(1,1) PRIMARY KEY, Blah NVARCHAR(MAX));
CREATE TABLE t2 (ID INT NOT NULL IDENTITY(1,1) PRIMARY KEY, t1ID INT NOT NULL, Blah NVARCHAR(MAX), CONSTRAINT FK_t2 FOREIGN KEY (t1ID) REFERENCES t1 (ID) );
CREATE TABLE t3 (ID INT NOT NULL IDENTITY(1,1) PRIMARY KEY, t2ID INT NOT NULL, Blah NVARCHAR(MAX), CONSTRAINT FK_t3 FOREIGN KEY (t2ID) REFERENCES t2 (ID) );

GO

DECLARE @PTable nvarchar(250) = 't1';

WITH CTEazyE AS (
   SELECT
      [object_id] AS ObjectID
      ,name AS TableName
      ,CAST(NULL AS sysname) AS ForeignKeyName
      ,NULL AS ReferencedTableID
      ,CAST(NULL AS sysname) AS ReferencedTableName
   FROM sys.tables
   WHERE name = @PTable

   UNION ALL

   SELECT
      fk.parent_object_id AS ID
     ,OBJECT_NAME(fk.parent_object_id) AS name
     ,fk.name
     ,ct.ObjectID AS ReferencedTableID
     ,ct.TableName AS ReferencedTableName
FROM sys.foreign_keys fk
INNER JOIN CTEazyE ct ON fk.referenced_object_id = ct.ObjectID )

SELECT DISTINCT
   ObjectID
   ,TableName
   ,ForeignKeyName
   ,ReferencedTableID
   ,ReferencedTableName
FROM CTEazyE
ORDER BY ReferencedTableName;

DROP TABLE t3;
DROP TABLE t2;
DROP TABLE t1;

In the results you should see the first row as the parent table and then t2 which references the parent table. Since t3 references t2 you will also see t3 in the results. The recursive CTE will keep going until it doesn't find any more constraints between tables. You can try this out on a table you know to see more meaningful results.

Recursive CTEs are a nice tool but need to be used with caution, like any recursive type of query. 

Working with XML in SQL Server

Sometimes we need to work with XML inside of SQL. This guide will demonstrate some ways you might store and retrieve XML data from SQL.

For this first example, we are going to store the XML data in an nvarchar field and then cast it to xml when we query the data.

CREATE TABLE #FormData (
   FormID int IDENTITY(1,1)
  ,FormDetailXML nvarchar(1024) );
  
INSERT INTO #FormData (FormDetailXML)
VALUES ('<form><Organization>Contoso</Organization><Contact>Jake Jones</Contact><Title>Manager</Title><EmailFrom>JakeJones@contoso.com</EmailFrom><Phone>555-555-5555</Phone><Address>125 Cherry Ln</Address><City>NY</City><States>NY</States><Zip>99999-9999</Zip></form>');

INSERT INTO #FormData (FormDetailXML)
VALUES ('<form><Organization>Northwind</Organization><Contact>Bill Blass</Contact><Title>Director</Title><EmailFrom>bblass@northwind.com.com</EmailFrom><Phone>333-333-3333</Phone><Address>1024 Bytes Blvd</Address><City>LA</City><States>CA</States><Zip>77777-7777</Zip></form>');

Now that we have our XML strings stored in the table let's cast the FormDetailXML to XML and view the results. Click on the XML link returned from the query, this will show you an organized view of the data.

SELECT 
   FormID
  ,CAST(FormDetailXML AS xml) AS FormDetailXML FROM #FormData

Now we are going to SELECT from the table this time parsing the XML in to individual columns per XML element. XML will always have a Node, typically with Elements and/or Attributes. "Form" is the Node and inside the node are the different Elements. Organization, Title, Address, Phone, zip, etc., these are all the Elements we want to parse out in to individual columns.

Here is our query to parse our XML Elements to individual columns.

SELECT
   FormID
  ,CAST(FormDetailXML AS XML).value('data(/form/Organization)[1]','varchar(100)') AS Organization
  ,CAST(FormDetailXML AS XML).value('data(/form/Contact)[1]','varchar(100)') AS Contact
  ,CAST(FormDetailXML AS XML).value('data(/form/Title)[1]','varchar(100)') AS Title
  ,CAST(FormDetailXML AS XML).value('data(/form/EmailFrom)[1]','varchar(100)') AS EmailAddress
  ,CAST(FormDetailXML AS XML).value('data(/form/Phone)[1]','varchar(100)') AS PhoneNumber
  ,CAST(FormDetailXML AS XML).value('data(/form/Address)[1]','varchar(100)') AS HomeAddress
  ,CAST(FormDetailXML AS XML).value('data(/form/City)[1]','varchar(100)') AS CityCode
  ,CAST(FormDetailXML AS XML).value('data(/form/States)[1]','varchar(100)') AS StateCode
  ,CAST(FormDetailXML AS XML).value('data(/form/Zip)[1]','varchar(100)') AS Zipcode
FROM #FormData

Let's breakdown a single Xquery line from the query above, we'll use the first line for Organization:

CAST(FormDetailXML AS XML).value('data(/form/Organization)[1]','varchar(100)') AS Organization

First we are casting the FormDetailXML data that is stored as nvarchar to XML:

CAST(FormDetailXML AS XML)

Next we use the value() method to perform an Xquery against our XML target, in this example the '(data(/form/Organization)[1]',

CAST(FormDetailXML AS XML).value

Ref: https://msdn.microsoft.com/en-us/library/ms178030(v=sql.105).aspx

Looking at the structure of our Xquery, we start with the word "data" followed by open paren'. "Data" is the data function and returns the typed value for each item specified.

('data(/form/Organization)[1]','varchar(100)')

Ref: https://msdn.microsoft.com/en-us/library/ms187038.aspx

Following the data function you see "(/form", that is our XML Node. This is followed by "/Organization", that is our XML Element. Finally we have our datatype, in this example varchar(100). This is the datatype you want to render the parsed Element to.*/

Note - There is another way you can write this query, moving the CAST function to a single line. Here is another way to query the XML data.

SELECT
   XMLFormDetails.value('data(/form/Organization)[1]','varchar(100)') AS Organization
  ,XMLFormDetails.value('data(/form/Contact)[1]','varchar(100)') AS Contact
  ,XMLFormDetails.value('data(/form/Title)[1]','varchar(100)') AS Title
  ,XMLFormDetails.value('data(/form/EmailFrom)[1]','varchar(100)') AS EmailAddress
  ,XMLFormDetails.value('data(/form/Phone)[1]','varchar(100)') AS PhoneNumber
  ,XMLFormDetails.value('data(/form/Address)[1]','varchar(100)') AS HomeAddress
  ,XMLFormDetails.value('data(/form/City)[1]','varchar(100)') AS CityCode
  ,XMLFormDetails.value('data(/form/States)[1]','varchar(100)') AS StateCode
  ,XMLFormDetails.value('data(/form/Zip)[1]','varchar(100)') AS Zipcode
FROM (SELECT CAST(FormDetailXML AS xml) AS XMLFormDetails FROM #FormData) AS fdx

Drop our temp table.

DROP TABLE #FormData;

This should give you a basic understanding of how to get Element values from Nodes in an XML string stored in SQL, but what if you have XML that also has attributes and you want to return the Attribute value for a given Element.

If you have ever tried to parse data output from an Extended Event session you probably already have some scripts that help you accomplish this. Let's look at what we need to do to parse an XML string and retrieve Attributes for specific Elements. We will use the output from an Extended Events session in our next example.

CREATE TABLE #XESessionData (
   FormID int IDENTITY(1,1)
  ,EventDetails nvarchar(1024) );

Below is  data capture from an Event Session, we are going to insert this in to our table:

INSERT INTO #XESessionData (EventDetails)
VALUES ('<event name="sql_statement_completed" package="sqlserver" timestamp="2015-02-13T20:56:19.482Z"><data name="duration"><value>23</value></data>
<data name="cpu_time"><value>889745</value></data><data name="physical_reads"><value>1245</value></data>
<data name="logical_reads"><value>22546</value></data><data name="writes"><value>17</value></data>
<action name="collect_system_time" package="package0"><value>2015-02-13T20:56:19.482Z</value></action>
<action name="session_id" package="sqlserver"><value>71</value></action><action name="database_name" package="sqlserver"><value>SQLAdmin</value></action>
<action name="sql_text" package="sqlserver"><value>use [SQLAdmin]</value></action></event>');

Take a look at the data in its stored form and cast as XML. Click on the XML link to get a better view of the data.

SELECT EventDetails FROM #XESessionData;

SELECT CAST(EventDetails AS xml) AS EventDetailsXML FROM #XESessionData;

--Here is the query you'd use to parse the XML and get your specific values for certain attributes.

SELECT
   xexml.value('(./action[@name="collect_system_time"]/value)[1]', 'varchar(4000)') as EventCollectTime
  ,xexml.value('(./action[@name="session_id"]/value)[1]', 'nvarchar(500)') as SessionID
  ,xexml.value('(./action[@name="database_name"]/value)[1]', 'nvarchar(500)') as DatabaseName
  ,xexml.value('(./data[@name="duration"]/value)[1]', 'bigint') as Duration
  ,xexml.value('(./data[@name="cpu_time"]/value)[1]', 'bigint') as CPUTime
  ,xexml.value('(./data[@name="physical_reads"]/value)[1]', 'bigint') as PhysicalReads
  ,xexml.value('(./data[@name="logical_reads"]/value)[1]', 'bigint') as LogicalReads
  ,xexml.value('(./data[@name="writes"]/value)[1]', 'bigint') as Writes
  ,xexml.value('(./action[@name="sql_text"]/value)[1]', 'varchar(4000)') as SQLText
FROM (SELECT CAST(EventDetails AS XML) XMLEventData FROM #XESessionData ) AS EventTable
CROSS APPLY XMLEventData.nodes('/event') n (xexml)

In the example above, we wrote this query in the same format as the second query in our first example. Here we also used the nodes() method to target the parent node "/event". Our XML has a "data" attribute that contains a child element for the "value", it also has an "action" attribute with a child element as well.

Ref: https://msdn.microsoft.com/en-us/library/ms188282.aspx

In the example below we are calling to the specific value of "duration", we are looking for the value found in the "value" child element of the duration attribute.

xexml.value('(./data[@name="duration"]/value)[1]', 'bigint')

Working through the above queries should give you a solid start in working with XML in SQL.

DROP TABLE #XESessionData

How to Convert a CYYMMDD Date in SSIS

If you have ever had to extract a date field from DB2 where the date format follows a CYYMMDD format because of Y2K, you probably understand some of the challenges of getting that in to a usable date field in SQL. In our environment the DB2 CYYMMDD was stored as a decimal, we needed to transform this to conform with a Date data type in SQL. Here is how we do it.

First you need to specify your data source in SSIS, this will be the DB2 data source. Once you have your data in the pipeline you'll want to create a Derived Column transform. Under the "Derived Column" drop down select "add as new column". In the Derived Column Name provide a name for your column, in this example DC_ReleasedDate. In the Expression field type the following expression:

(DT_DATE)(ReleasedDate == 0 ? "1900/01/01" : (SUBSTRING(((DT_WSTR,10)(ReleasedDate + 19000000)),1,4) + "/" + SUBSTRING(((DT_WSTR,10)(ReleasedDate + 19000000)),5,2) + "/" + SUBSTRING((DT_WSTR,10)(ReleasedDate + 19000000),7,2)))

You can replace "ReleasedDate" with your own DB2 date data field. In the above expression, we are creating a default date of "1900/01/01" if no date exists but this part can be removed if you need.

Where you see (DT_DATE) at the beginning of the expression, that is casting the expression as a date. Following that you see ReleasedDate. ReleasedDate is the name of our date field in DB2. We are looking for any dates that = 0 and if a date = 0 then it is replaced with "1900/01/01" (a string), if the date does not = 0 then it adds 19000000 to the decimal date and then converts it to a string (DT_WSTR). We add the 19000000 so we can get accurate dates from both 0 and 1 century fields, the c in cyymmdd. Next we are using SUBSTRING to get the yyyy. We do the same for month and day while concatenating each with a forward slash. The end result is a string of yyyy/mm/dd that is cast as a date, where we started in the expression. You can also accomplish this in a script task but for me I found this to be easier.

The destination table in SQL has a [Date] data type since we don't have a timestamp in DB2, only date. You could still work the same solution with a timestamp, it would just require a little extra work in the expression.

Configure Dynamic Data Sources in and SSRS Report

Configuring a dynamic data source, a data source you call at run-time, has many purposes. Say you would like to run a production report against one or multiple test environments or run performance reports against all SQL servers you manage; with dynamic data sources you could pick which server you want to run the report against at run-time without having to modify the report itself.

In our example below we are going to use a table that holds all of the SQL Server names we want to use in the dynamic data source. We'll query this table to generate a drop down list for our server selection, which then builds a dynamic connection string to a particular server. 

So the first step is to create an SSRS report. Create an embedded data source named SetupDataSource source and build your report from the this data source. You won't be switching to the dynamic data source until the very end. If you want to query a table to return a list of server names you will also want to use the SetupDataSource to query the table. For the report content, I would start with something simple, like querying your server wait stats.

Once you have built your report, create a new report parameter named "SQLServerName":

SSRS1.jpg

Once you have set the name go to the Available Values tab and click the radio button for "Get values from a query". We already created a data set to query the table with my server names. The table has a single column with server names only. If you don't want to select from a table you could instead manually enter your values under "specify value". In our example we've used "get values from a query", the data set is named SelectServer, the value field is ServerName, and the label field is ServerName:

SSRS2.jpg

Next we need to create the dynamic data source--this is an embedded data source. We are going to create a dynamic data source named DynamicDataSource with the type as Microsoft SQL Server:

SSRS3.jpg

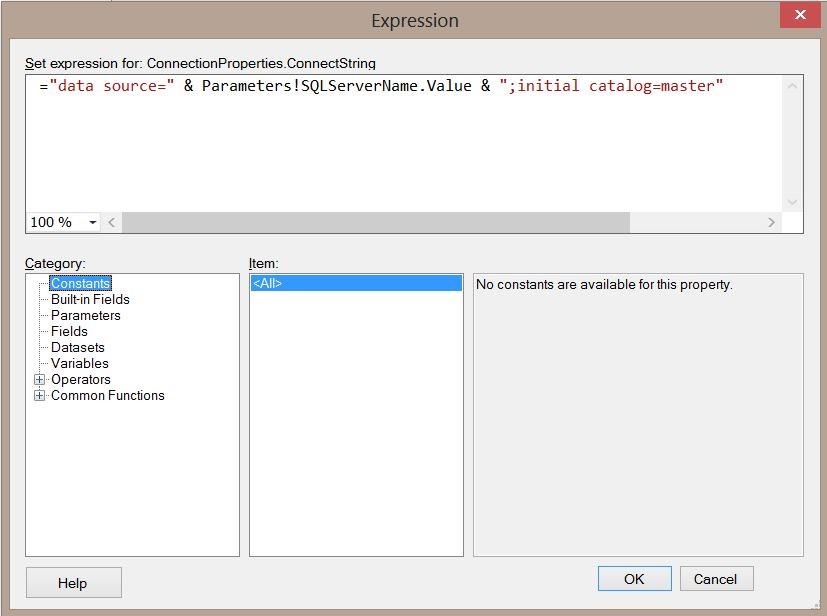
Now we need to setup the connection string using an expression. Click the expression button to bring up the editor:

SSRS4.jpg

The data source is the SQL server name—we get this name from the parameter we created "SQLServerName". The initial catalog is the database, in this case master. Enter the following (pictured above) and the click OK.

="data source=" & Parameters!SQLServerName.Value & ";initial catalog=master"

Now that we have the dynamic data source setup, go back to each of your datasets (for example, the dataset you created for server wait stats) and change the dataset to use the embedded, dynamic data source and click OK. When you do this you will get an alert:

SSRS5.jpg

It can't update the field list because the data source is dynamic now. Just click OK to continue. Now go ahead and preview your report—you should see a drop down list with the SQL servers we setup in the SQLServerName report parameter. Select the server you want to run against and click Run Report. You should now see a list of wait stats for the selected server. 

Tip: I always query the SERVERPROPERTY to return the server name so that I know which server I'm connected to, it's an easy way to verify you are on the correct server.